Autodesk announced Maya 2012. Autodesk Maya 2012 new features:
Node-Based Render Passes
Substance Procedural Textures
Viewport 2.0 Enhancement
Editable Motion Trails
New Simulation Options
Vector Displacement Map Support
Motion Capture Samples
Python API Enhancements etc. We will discuss these features in depth in next post.
Wednesday, April 13, 2011
Wednesday, February 9, 2011

Wednesday, November 3, 2010
Sunday, August 22, 2010
TVCA ANIFEST 2010 BEST SHORT FILM AWARD

DNA Inc’s FEEL THE PUNCH triumphed at the TASI Anifest India 2010 by winning First Prize in the Student Film category of TASI Viewer’s Choice Awards ,2010 held at Fine Arts Cultural Center, Mumbai.
Been part of the movie as mentor. I’m honored and delighted with the award that we have won at Anifest. This is the first award for ‘FEEL THE PUNCH’, hopefully the first of many to come.
Among the 320+ entries in different categories, the film earned a place in the finalists list of Student Films, which consisted of 15 films shortlisted by Jury Panel consisting of eminent personalities from the Animation Industry.
Wednesday, April 7, 2010
CHARACTER LIGHTING IN MAYA WITH MENTALRAY MULTIPASS RENDERING
MenatalRay for Maya in Maya 2009 gives us a great flexibility to render our scene into multiple render passes and later combine in compositing. All the images are the property of DNA Inc (Dilsukhnagar Arena Incubation). Here I will show a simple character lighting With MentalRay. I am splitting Maya scene into Two render Layers.
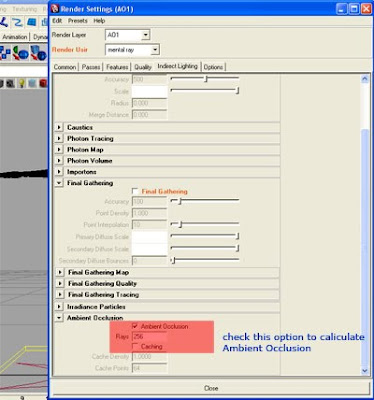
One for Ambient Occlusion (I call this renderLayer as No light Layer) and another for Lights. Preparing the scene for render Passes. First select the geometry and create a renderLayer, Maya assigns a separate renderLayer for the selected geometry. Select MentalRay as renderer and in the indirect lighting Tab select Ambient Occlusion option with 256 rays (even you can go with 128 or less rays also). And for this no need to calculate GI or FG.
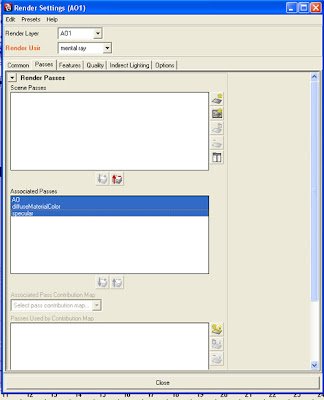
After this in passes tab create passes AO, diffuseMaterialColor and Specular. Associate the passes with the current renderLayer by using arrow button located in the middle of scene passes and associated passes windows. like this....
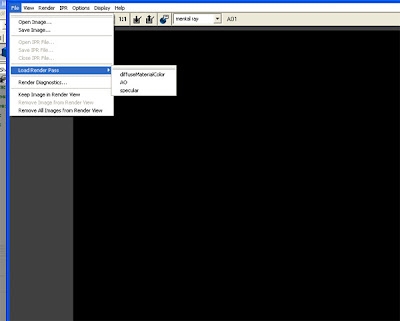
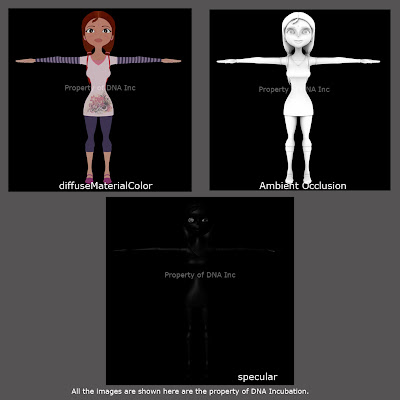
Now we will render the scene (sill now we never used any light, we will use lights in the next step) and we will get render image one in render buffer (this is called as masterbeauty) and all the passes in the project images directory under temp folder. like C:\projects\images\tmp\layer1\AO, C:\projects\images\tmp\layer1\diffuseMaterialColor, C:\projects\images\tmp\layer1\specular the same can be accesed from the render buffer or renderview with file>loadrenderpass option.
And the render images looks like this...
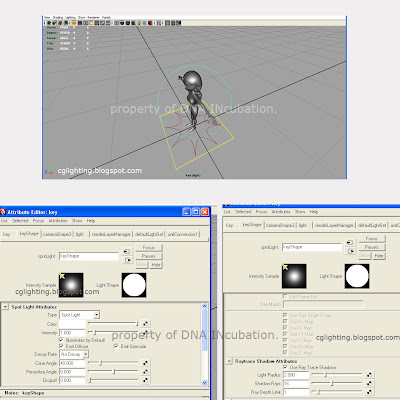
Now the actual lighting begins... I am going to put one Key light, one rim light and by calculating Global Illumination controlling the fill light for this. Let we see key light settings. For Key light I used one spot light with raytraced shadows.(here we dont have any complex geometry so ratraced shadow calculation will be the ideal choice, even we can go with Dmap shadows but controlling Dmap shadows in MentalRay is bit tricky. I will post another tutorial on using Dmap shadows with Mentalray) The light placement and the light attributes are here....
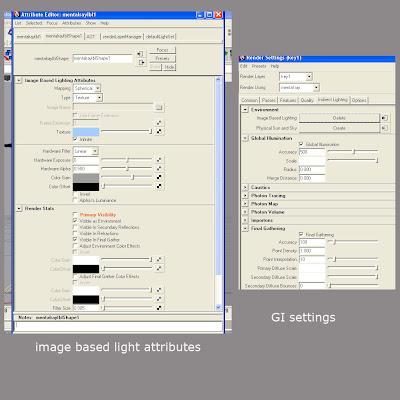
I use a bounce dome instead of a fill light (image based lighting option: texture) for indirect light calculation to fill the dark areas of created by Key light and the setting are like this.....
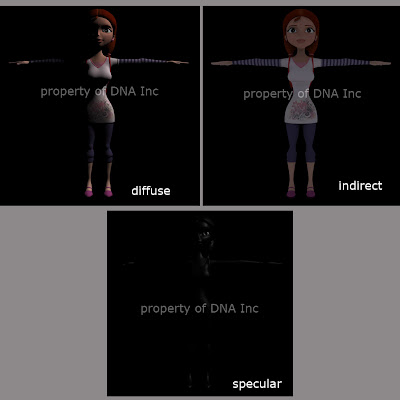
and renders will be like this...(diffuse, indirect, specular passes)
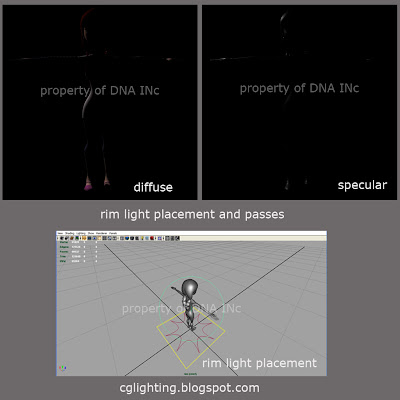
Now the rim light follow the same as key light render layer place the light slightly opposite to the key light position to get a subtle rim light on the character and choose diffuse and specular passes for rendering. The light placement and the renders are here.....
Compositing the render passes:
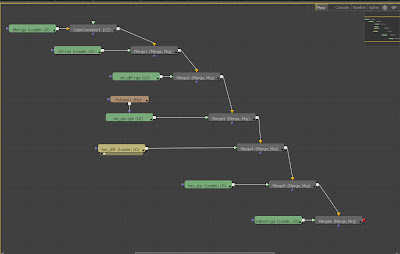
Am not an expert compositor I am little bit handy with Digital Fusion. Let we connet the passes in Fusion. first connect diffuseMaterial color pass with AO and choose Multiply blend mode. add color corrector to diffuseMaterial color pass and dicrease gain to 0.5, And connect rest of the passes in this order...
and final out put will look like this...
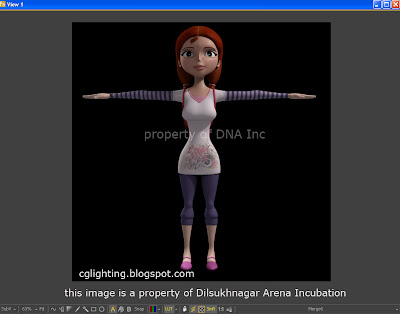
This is raw output and we can tweak it to get more perfect look. I will post advanced lighting tutorial shortly.... The Character what I used in this tutorial is a property of Dilsukhnagar Arena Incubation and all rights reserved with them.....
One for Ambient Occlusion (I call this renderLayer as No light Layer) and another for Lights. Preparing the scene for render Passes. First select the geometry and create a renderLayer, Maya assigns a separate renderLayer for the selected geometry. Select MentalRay as renderer and in the indirect lighting Tab select Ambient Occlusion option with 256 rays (even you can go with 128 or less rays also). And for this no need to calculate GI or FG.

After this in passes tab create passes AO, diffuseMaterialColor and Specular. Associate the passes with the current renderLayer by using arrow button located in the middle of scene passes and associated passes windows. like this....

Now we will render the scene (sill now we never used any light, we will use lights in the next step) and we will get render image one in render buffer (this is called as masterbeauty) and all the passes in the project images directory under temp folder. like C:\projects\images\tmp\layer1\AO, C:\projects\images\tmp\layer1\diffuseMaterialColor, C:\projects\images\tmp\layer1\specular the same can be accesed from the render buffer or renderview with file>loadrenderpass option.

And the render images looks like this...

Now the actual lighting begins... I am going to put one Key light, one rim light and by calculating Global Illumination controlling the fill light for this. Let we see key light settings. For Key light I used one spot light with raytraced shadows.(here we dont have any complex geometry so ratraced shadow calculation will be the ideal choice, even we can go with Dmap shadows but controlling Dmap shadows in MentalRay is bit tricky. I will post another tutorial on using Dmap shadows with Mentalray) The light placement and the light attributes are here....

I use a bounce dome instead of a fill light (image based lighting option: texture) for indirect light calculation to fill the dark areas of created by Key light and the setting are like this.....

and renders will be like this...(diffuse, indirect, specular passes)

Now the rim light follow the same as key light render layer place the light slightly opposite to the key light position to get a subtle rim light on the character and choose diffuse and specular passes for rendering. The light placement and the renders are here.....

Compositing the render passes:
Am not an expert compositor I am little bit handy with Digital Fusion. Let we connet the passes in Fusion. first connect diffuseMaterial color pass with AO and choose Multiply blend mode. add color corrector to diffuseMaterial color pass and dicrease gain to 0.5, And connect rest of the passes in this order...

and final out put will look like this...

This is raw output and we can tweak it to get more perfect look. I will post advanced lighting tutorial shortly.... The Character what I used in this tutorial is a property of Dilsukhnagar Arena Incubation and all rights reserved with them.....
Saturday, March 20, 2010
Maya 2009 Multipass Rendering
Now Maya 2009 can render output into multi-passes across the render layers. All is well But still it has few cons like Maya 2009 Multipass rendering cant support MentalRay shaders.
How Maya 2009 Multi-pass render engine works?
Mata 2009 Multi passes works with renderlayers and MentalRay renderer. With Maya shaders. We can render a scene in to multiple passes on the basis of which shading group we use. And it gives us great flexibility to tweak final look and feel in the post with any compositing software.
next posting:
Rendering A Maya Scene into Multiple render Passes

Subscribe to:
Posts (Atom)


