Autodesk announced Maya 2012. Autodesk Maya 2012 new features:
Node-Based Render Passes
Substance Procedural Textures
Viewport 2.0 Enhancement
Editable Motion Trails
New Simulation Options
Vector Displacement Map Support
Motion Capture Samples
Python API Enhancements etc. We will discuss these features in depth in next post.
Wednesday, April 13, 2011

Wednesday, February 9, 2011

Wednesday, November 3, 2010
Sunday, August 22, 2010
TVCA ANIFEST 2010 BEST SHORT FILM AWARD

DNA Inc’s FEEL THE PUNCH triumphed at the TASI Anifest India 2010 by winning First Prize in the Student Film category of TASI Viewer’s Choice Awards ,2010 held at Fine Arts Cultural Center, Mumbai.
Been part of the movie as mentor. I’m honored and delighted with the award that we have won at Anifest. This is the first award for ‘FEEL THE PUNCH’, hopefully the first of many to come.
Among the 320+ entries in different categories, the film earned a place in the finalists list of Student Films, which consisted of 15 films shortlisted by Jury Panel consisting of eminent personalities from the Animation Industry.
Wednesday, April 7, 2010
CHARACTER LIGHTING IN MAYA WITH MENTALRAY MULTIPASS RENDERING
MenatalRay for Maya in Maya 2009 gives us a great flexibility to render our scene into multiple render passes and later combine in compositing. All the images are the property of DNA Inc (Dilsukhnagar Arena Incubation). Here I will show a simple character lighting With MentalRay. I am splitting Maya scene into Two render Layers.
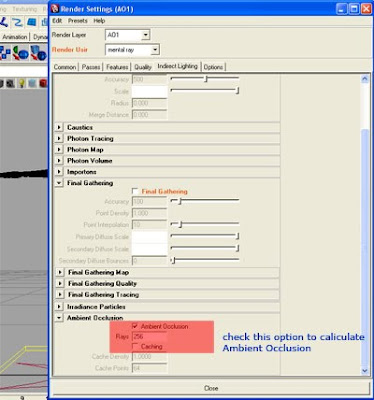
One for Ambient Occlusion (I call this renderLayer as No light Layer) and another for Lights. Preparing the scene for render Passes. First select the geometry and create a renderLayer, Maya assigns a separate renderLayer for the selected geometry. Select MentalRay as renderer and in the indirect lighting Tab select Ambient Occlusion option with 256 rays (even you can go with 128 or less rays also). And for this no need to calculate GI or FG.
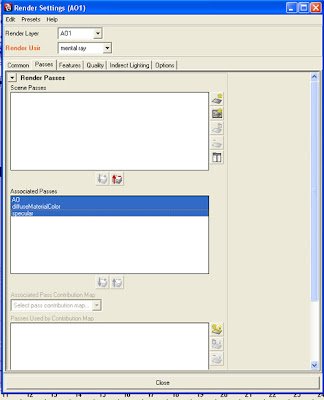
After this in passes tab create passes AO, diffuseMaterialColor and Specular. Associate the passes with the current renderLayer by using arrow button located in the middle of scene passes and associated passes windows. like this....
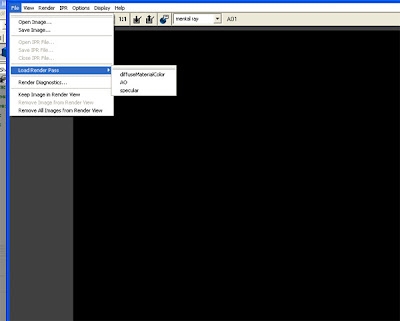
Now we will render the scene (sill now we never used any light, we will use lights in the next step) and we will get render image one in render buffer (this is called as masterbeauty) and all the passes in the project images directory under temp folder. like C:\projects\images\tmp\layer1\AO, C:\projects\images\tmp\layer1\diffuseMaterialColor, C:\projects\images\tmp\layer1\specular the same can be accesed from the render buffer or renderview with file>loadrenderpass option.
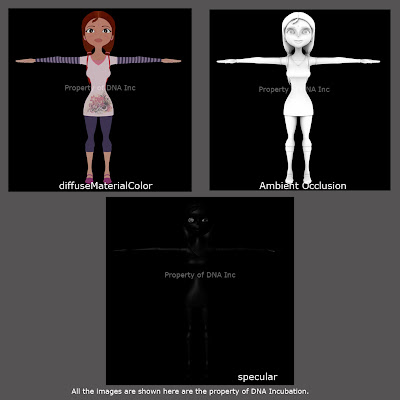
And the render images looks like this...
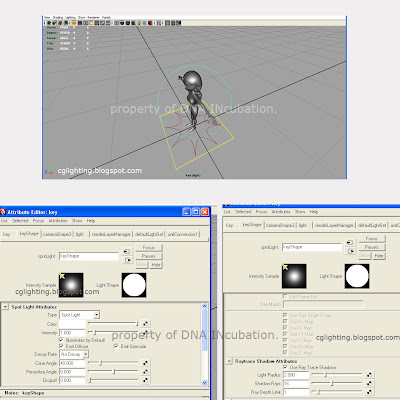
Now the actual lighting begins... I am going to put one Key light, one rim light and by calculating Global Illumination controlling the fill light for this. Let we see key light settings. For Key light I used one spot light with raytraced shadows.(here we dont have any complex geometry so ratraced shadow calculation will be the ideal choice, even we can go with Dmap shadows but controlling Dmap shadows in MentalRay is bit tricky. I will post another tutorial on using Dmap shadows with Mentalray) The light placement and the light attributes are here....
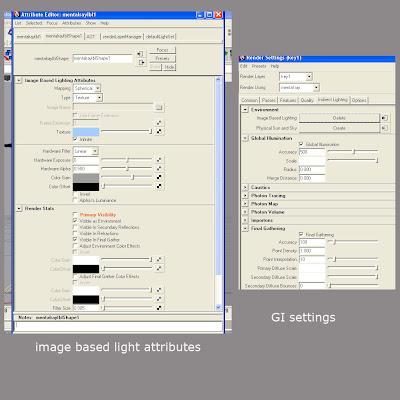
I use a bounce dome instead of a fill light (image based lighting option: texture) for indirect light calculation to fill the dark areas of created by Key light and the setting are like this.....
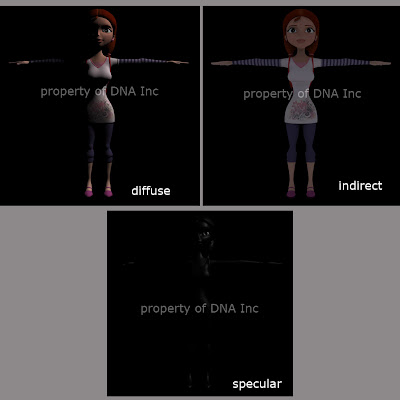
and renders will be like this...(diffuse, indirect, specular passes)
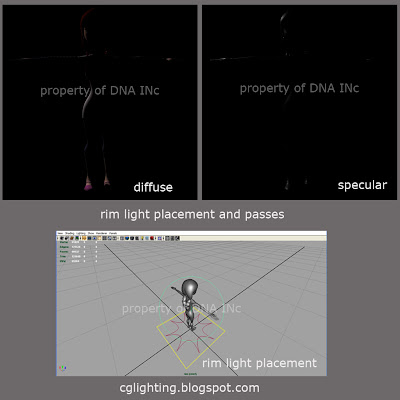
Now the rim light follow the same as key light render layer place the light slightly opposite to the key light position to get a subtle rim light on the character and choose diffuse and specular passes for rendering. The light placement and the renders are here.....
Compositing the render passes:
Am not an expert compositor I am little bit handy with Digital Fusion. Let we connet the passes in Fusion. first connect diffuseMaterial color pass with AO and choose Multiply blend mode. add color corrector to diffuseMaterial color pass and dicrease gain to 0.5, And connect rest of the passes in this order...
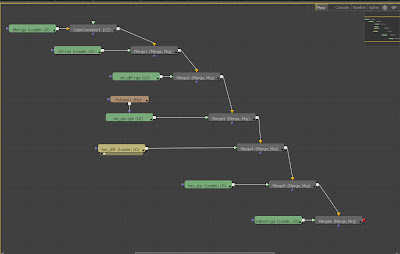
and final out put will look like this...
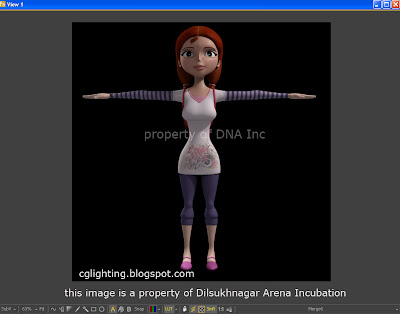
This is raw output and we can tweak it to get more perfect look. I will post advanced lighting tutorial shortly.... The Character what I used in this tutorial is a property of Dilsukhnagar Arena Incubation and all rights reserved with them.....
One for Ambient Occlusion (I call this renderLayer as No light Layer) and another for Lights. Preparing the scene for render Passes. First select the geometry and create a renderLayer, Maya assigns a separate renderLayer for the selected geometry. Select MentalRay as renderer and in the indirect lighting Tab select Ambient Occlusion option with 256 rays (even you can go with 128 or less rays also). And for this no need to calculate GI or FG.

After this in passes tab create passes AO, diffuseMaterialColor and Specular. Associate the passes with the current renderLayer by using arrow button located in the middle of scene passes and associated passes windows. like this....

Now we will render the scene (sill now we never used any light, we will use lights in the next step) and we will get render image one in render buffer (this is called as masterbeauty) and all the passes in the project images directory under temp folder. like C:\projects\images\tmp\layer1\AO, C:\projects\images\tmp\layer1\diffuseMaterialColor, C:\projects\images\tmp\layer1\specular the same can be accesed from the render buffer or renderview with file>loadrenderpass option.

And the render images looks like this...

Now the actual lighting begins... I am going to put one Key light, one rim light and by calculating Global Illumination controlling the fill light for this. Let we see key light settings. For Key light I used one spot light with raytraced shadows.(here we dont have any complex geometry so ratraced shadow calculation will be the ideal choice, even we can go with Dmap shadows but controlling Dmap shadows in MentalRay is bit tricky. I will post another tutorial on using Dmap shadows with Mentalray) The light placement and the light attributes are here....

I use a bounce dome instead of a fill light (image based lighting option: texture) for indirect light calculation to fill the dark areas of created by Key light and the setting are like this.....

and renders will be like this...(diffuse, indirect, specular passes)

Now the rim light follow the same as key light render layer place the light slightly opposite to the key light position to get a subtle rim light on the character and choose diffuse and specular passes for rendering. The light placement and the renders are here.....

Compositing the render passes:
Am not an expert compositor I am little bit handy with Digital Fusion. Let we connet the passes in Fusion. first connect diffuseMaterial color pass with AO and choose Multiply blend mode. add color corrector to diffuseMaterial color pass and dicrease gain to 0.5, And connect rest of the passes in this order...

and final out put will look like this...

This is raw output and we can tweak it to get more perfect look. I will post advanced lighting tutorial shortly.... The Character what I used in this tutorial is a property of Dilsukhnagar Arena Incubation and all rights reserved with them.....
Saturday, March 20, 2010
Maya 2009 Multipass Rendering
Now Maya 2009 can render output into multi-passes across the render layers. All is well But still it has few cons like Maya 2009 Multipass rendering cant support MentalRay shaders.
How Maya 2009 Multi-pass render engine works?
Mata 2009 Multi passes works with renderlayers and MentalRay renderer. With Maya shaders. We can render a scene in to multiple passes on the basis of which shading group we use. And it gives us great flexibility to tweak final look and feel in the post with any compositing software.
next posting:
Rendering A Maya Scene into Multiple render Passes
How Maya 2009 Multi-pass render engine works?
Mata 2009 Multi passes works with renderlayers and MentalRay renderer. With Maya shaders. We can render a scene in to multiple passes on the basis of which shading group we use. And it gives us great flexibility to tweak final look and feel in the post with any compositing software.
next posting:
Rendering A Maya Scene into Multiple render Passes
Wednesday, February 3, 2010

Tuesday, October 6, 2009
HOW TO RENDER RGB MATTES IN MAYA
Since long time I was thinking to post rendering RGB(primary color) mattes in Maya to tweak lighting out put in any compositing software. After receiving mail from Jesper Hammarbäck I am posting it right now. particularly if you are using Maya 2009 or greater, its a great comfort to render more RGB mattes at a time by using new renderpass feature with mentalray. I am going to explain rendering RGB mattes of a car model using Maya 2009 MentalRay. This is the Car Model...
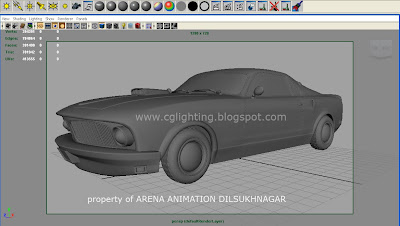
Lets start preparing shaders for RGB mattes. With Maya 2009 MentalRay we can seperate
ambientRaw
diffuseMaterialColor
incandescence
reflectedMaterialColor
even we can render in to more type of passes according to the shader what we use. These type of passes can be used to render multiple RGB mattes in a single render.
First: preparing rgb mattes in ambient color.
create a Lambert shader change color value to white, ambient value to red and change rest of the values to "0".as shown in this images.choose pure red (value 1) in color chooser and leave blue and green values to "0".
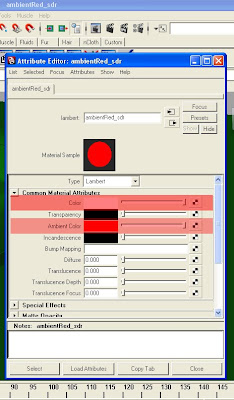
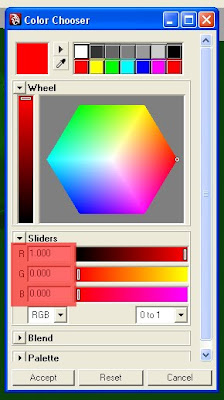
repeat same steps by changing values for green and blue as shown in below images
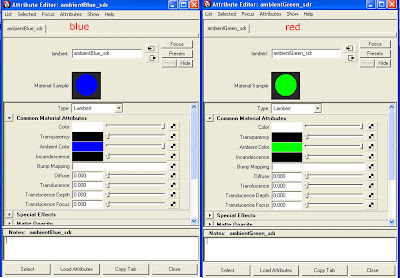
assign these shaders to the geometry in the scene.(I assigned to the wheels of this car)
now we will start preparing rgb mattes in incandescence. (you can render only 3 mattes at a time if you have more geometry parts to control you need to render many rgb mattes instead of rendering more scenes we will prepare shaders with with different channels and assign to different parts of the geometry and render in to seperate passes so that you could get more rgb mattes in a single render)like this
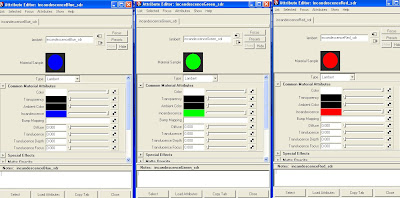
Now we prepare another shader to render RGB mattes in reflection pass. This is little complex than the earlier passes. First create a phong shader change; color, transparency, ambient color and incandescence channels to black and connect ramp in specular and reflected color channels change ramp to red color and cosine power and reflectivity values to 100 and 1 respectively like the images below..
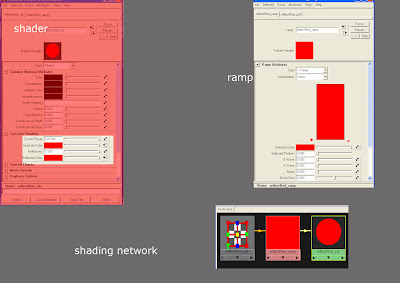
Now we have 3 shaders with 3 RGB passes each i.e we get 9 RGB mattes in one render.Assign these shaders to nine different objects in scene and follow render settings like this
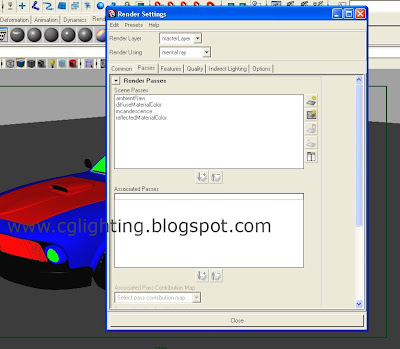
Now associate the render passes with renderlayer and render it you could get render output in to 4 passes consisting of RGB mattes/masks. Here is the output
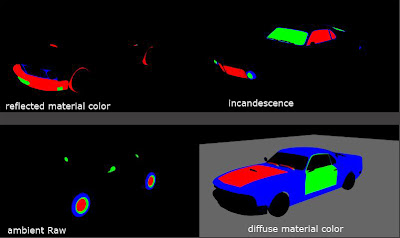
if you need a tool to download based on this, you can visit http://pragmaticartistry.com/.

Lets start preparing shaders for RGB mattes. With Maya 2009 MentalRay we can seperate
ambientRaw
diffuseMaterialColor
incandescence
reflectedMaterialColor
even we can render in to more type of passes according to the shader what we use. These type of passes can be used to render multiple RGB mattes in a single render.
First: preparing rgb mattes in ambient color.
create a Lambert shader change color value to white, ambient value to red and change rest of the values to "0".as shown in this images.choose pure red (value 1) in color chooser and leave blue and green values to "0".


repeat same steps by changing values for green and blue as shown in below images

assign these shaders to the geometry in the scene.(I assigned to the wheels of this car)
now we will start preparing rgb mattes in incandescence. (you can render only 3 mattes at a time if you have more geometry parts to control you need to render many rgb mattes instead of rendering more scenes we will prepare shaders with with different channels and assign to different parts of the geometry and render in to seperate passes so that you could get more rgb mattes in a single render)like this

Now we prepare another shader to render RGB mattes in reflection pass. This is little complex than the earlier passes. First create a phong shader change; color, transparency, ambient color and incandescence channels to black and connect ramp in specular and reflected color channels change ramp to red color and cosine power and reflectivity values to 100 and 1 respectively like the images below..

Now we have 3 shaders with 3 RGB passes each i.e we get 9 RGB mattes in one render.Assign these shaders to nine different objects in scene and follow render settings like this

Now associate the render passes with renderlayer and render it you could get render output in to 4 passes consisting of RGB mattes/masks. Here is the output

if you need a tool to download based on this, you can visit http://pragmaticartistry.com/.
Thursday, October 1, 2009
EXTERIOR SET LIGHTING WITH 3DS MAX
 After a long time (near about 7Years) I tried to lit a scene in 3ds Max. I took neutral (only blin with no speculars) shading exterior set and started afternoon lighting with default scanline render. The set looks like this without any lights.
Start with one freeDirectional light to simulate Sun. with settings shdows on with shodow map shadow options. ">


change the bias to 0.05(by default 3dsmax renderer calculates shadow bias as 1.0 but this value takes shadow out from the origin. like this image.
this image shows corrected bias value for this set. so the shadows will stay at the origin of the geometry. This occurs because of the shadow map calculation by scanline render. It creates a 2d map of the geometry from light's view. bias value controls the placement of the shadow map.

Now we need to add a fill light to eliminate the darkness created by keyshadows. for this I used a freeSpot light with values like this and position that light somewhere around opposite to the sun light direction.


and render output with fill light and sun light looks like this

Now back side of the set is too dark and fill light is not reaching there. So create a point light and include only that surface to the light illumination and shadow parameters and the light settings should be like this; use inverse square as the decay rate. it restrics light to a limited distance. by default all the cg lights comes with infinite range. we can control with decay and attenuation parameters. Rendered image with fill light added for the back side of the set should look like this

Now back side of the set is too dark and fill light is not reaching there. So create a point light and include only that surface to the light illumination and shadow parameters and the light settings should be like this; use inverse square as the decay rate. it restrics light to a limited distance. by default all the cg lights comes with infinite range. we can control with decay and attenuation parameters. Rendered image with fill light added for the back side of the set should look like this


Now we will start adding more lights for detailing and simulating the bounce of the sun.add bounce for the balcony. usually in midday noon time bounce is more and it bounce the texture/shader color of the nearby geometry since we have only gray color shading so the light bounces with default sun light color. these are the settings for balcony bounce light. I used a omni light as the bounce light and included only balcony base geometry to lights illumination and shadow parameters ( include and exclude parameters are similar to Maya make/brake light links attribute). light settings are like this;

and the rendered image should look like this

Now balcony top fill...

Now adding bounce light for fabrik in the foreground with a free spot positioned from the bottom with this settings....

and render out put is like this....

Now add details to pillars by using free spot.(spot lights are more orthodox lights with less render time, I encourage the usage of spot lights more often)when ever you get confused with which light illuminating which geometry you can simply unchek the lights in lightlister(cool tool in 3dsMax) and chek the individual lights illuminating geometry! render output with added details to the pillar.

Now start adding details to the wooden rack in the foreground. with usual spot lights. this is the render output...

Now small pillar in the background.

Fabrik key in order to match sun illumination.....

Bounce light for Small balcony right side of the set.....

after adding global fill for floor and fill for backside geometry.. the image should look like this.

Saturday, September 26, 2009
WHAT'S NEW IN 3DS MAX 2010 LIGHTING AND RENDERING
UI improvements

New Scene Explorer

New Material Explorer

New Render Frame Window (MentalRay)

Global Tuning Parameters


New Scene Explorer

New Material Explorer

New Render Frame Window (MentalRay)

Global Tuning Parameters

WHAT'S NEW IN MAYA 2010 LIGHTING AND RENDERING
New release of autodesk Maya 2010 has improved global illumination, compatible workflow to export all the render layers/passes to autodesk Toxik, MenatalRay network rendering using autodesk Backburner. and many more. Few of the new features of Maya 2010 are given below.
New stereoscopic workflow added
Maya vector renderer now supported
Five mental ray for Maya batch rendering licenses available for command line rendering
Eight remote licenses now available for all users of mental ray satellite rendering
so happy rendering.
New stereoscopic workflow added
Maya vector renderer now supported
Five mental ray for Maya batch rendering licenses available for command line rendering
Eight remote licenses now available for all users of mental ray satellite rendering
so happy rendering.
Saturday, July 25, 2009
FAKING GI WITH MAYA SOFTWARE RENDER
This tutorial describes how to fake GI by using lights in Maya software renderer, means we are going to simulate occlusion shadows within the Maya. For this I used a set available in www.3drender.com, you can download from http://www.3drender.com/challenges/index.htm . open the scene and set a camera to match the view like this.
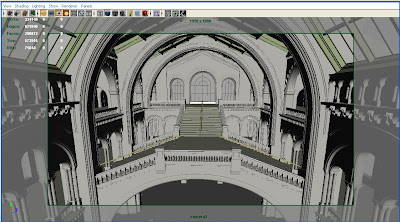
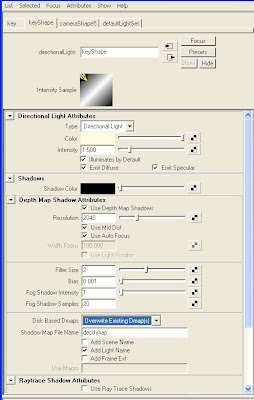
set the render settings as resolution 1920*1080, preview quality with raytrace off. We are going to use only depth map shadows. lets start the lighting. First we need to set sun light/key light by using directional light. create a directional light. adjust the light to cast afternoon kind of shadow.( usually afternoon shadows are short in length and very krisp. These should be 1:0.75 in length comparative to the object length. directional light settings should be like this..
match key direction to this image
Now setup lights to get soft occluding geometry shadows on the front side wall. For this use point lights with dmap shadows with high filter size. These light attributes should be like this.
and render should be like this
set three more fill lights with same settings and change decay rate accordingly after setting up all the key lights the set should look like this.
Now you can see soft occlusion kind of shadows on the occluding walls archs etc..
And this method is useful whenever you light and render heavy BGs with complex geometry. You can save lot of time against mentalRay Ambiant occlusion caliculation. I rendered full HD resolution(1920*1080)in less than 3 minutes!

set the render settings as resolution 1920*1080, preview quality with raytrace off. We are going to use only depth map shadows. lets start the lighting. First we need to set sun light/key light by using directional light. create a directional light. adjust the light to cast afternoon kind of shadow.( usually afternoon shadows are short in length and very krisp. These should be 1:0.75 in length comparative to the object length. directional light settings should be like this..

match key direction to this image

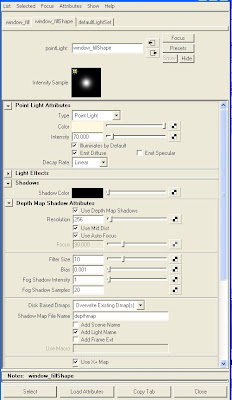
Now setup lights to get soft occluding geometry shadows on the front side wall. For this use point lights with dmap shadows with high filter size. These light attributes should be like this.

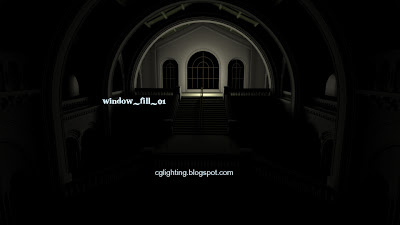
and render should be like this

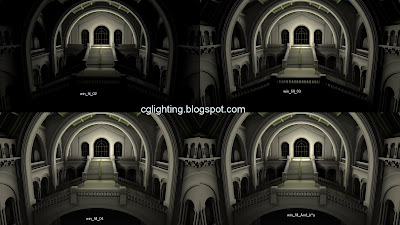
set three more fill lights with same settings and change decay rate accordingly after setting up all the key lights the set should look like this.

Now you can see soft occlusion kind of shadows on the occluding walls archs etc..
And this method is useful whenever you light and render heavy BGs with complex geometry. You can save lot of time against mentalRay Ambiant occlusion caliculation. I rendered full HD resolution(1920*1080)in less than 3 minutes!
Subscribe to:
Posts (Atom)


 Posts
Posts


